User Guide
AddressBook Level 3 (AB3) is a desktop app for managing contacts, optimized for use via a Command Line Interface (CLI) while still having the benefits of a Graphical User Interface (GUI). If you can type fast, AB3 can get your contact management tasks done faster than traditional GUI apps.
- Quick start
-
Features
- Viewing help :
help - Adding a application:
add - Listing all applications :
list - Editing a application :
edit - Locating applications:
find - 📖 Terminology
- ⚠️ General Behaviour
- ⚠️ Important: Prefix-Based Filtering
- Examples:
- Viewing archived applications
- Deleting a application :
delete - Archiving an application :
archive - Unarchiving an application :
unarchive - Viewing application summary :
Summary - Opening application notes :
open - Clearing all entries :
clear - Exiting the program :
exit - Saving the data
- Editing the data file
- Archiving data files
[coming in v2.0]
- Viewing help :
- FAQ
- Known issues
- Command summary
Quick start
-
Ensure you have Java
17or above installed in your Computer.
Mac users: Ensure you have the precise JDK version prescribed here. -
Download the latest
.jarfile from here. -
Copy the file to the folder you want to use as the home folder for your AddressBook.
-
Open a command terminal,
cdinto the folder you put the jar file in, and use thejava -jar addressbook.jarcommand to run the application.
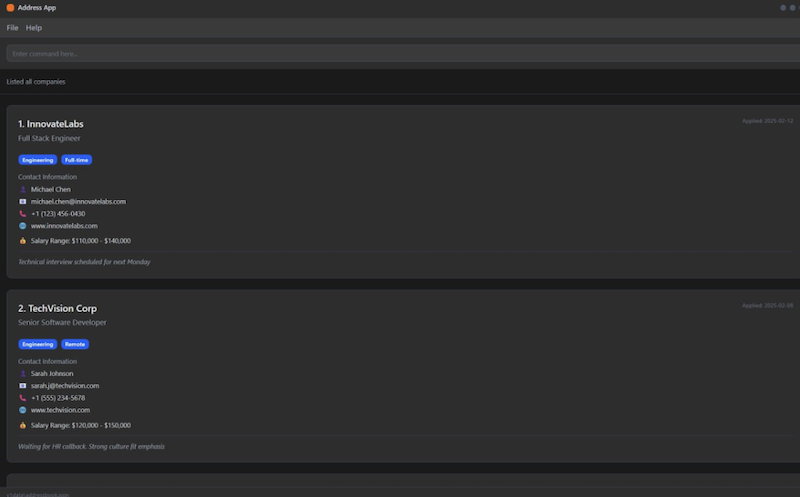
A GUI similar to the below should appear in a few seconds. Note how the app contains some sample data.
-
Type the command in the command box and press Enter to execute it. e.g. typing
helpand pressing Enter will open the help window.
Some example commands you can try:-
list: Lists all contacts. -
add n/John Doe p/98765432 e/johnd@example.com a/John street, block 123, #01-01: Adds a contact namedJohn Doeto the Address Book. -
delete 3: Deletes the 3rd contact shown in the current list. -
clear: Deletes all contacts. -
exit: Exits the app.
-
-
Refer to the Features below for details of each command.
Features
![]() Notes about the command format:
Notes about the command format:
-
Words in
UPPER_CASEare the parameters to be supplied by the user.
e.g. inadd n/NAME,NAMEis a parameter which can be used asadd n/John Doe. -
Items in square brackets are optional.
e.gn/NAME [t/TAG]can be used asn/John Doe t/friendor asn/John Doe. -
Items with
… after them can be used multiple times including zero times.
e.g.[t/TAG]…can be used ast/friend,t/friend t/familyetc. -
Parameters can be in any order.
e.g. if the command specifiesn/NAME p/PHONE_NUMBER,p/PHONE_NUMBER n/NAMEis also acceptable. -
Extraneous parameters for commands that do not take in parameters (such as
help,list,exitandclear) will be ignored.
e.g. if the command specifieshelp 123, it will be interpreted ashelp. -
If you are using a PDF version of this document, be careful when copying and pasting commands that span multiple lines as space characters surrounding line-breaks may be omitted when copied over to the application.
Viewing help : help
Shows a message explaining how to access the help page.

Format: help
Adding a application: add
Adds a application to the address book.
Format: add n/NAME p/PHONE_NUMBER e/EMAIL a/ADDRESS [t/TAG]…
Examples:
add n/John Doe p/98765432 e/johnd@example.com a/John street, block 123, #01-01add n/Betsy Crowe t/friend e/betsycrowe@example.com a/Newgate Prison p/1234567 t/criminal
Listing all applications : list
Shows a list of all applications in the address book.
Format: list
Editing a application : edit
Edits an existing application in the address book.
Format: edit INDEX [n/NAME] [p/PHONE] [e/EMAIL] [a/ADDRESS] [t/TAG]…
- Edits the application at the specified
INDEX. The index refers to the index number shown in the displayed application list. The index must be a positive integer 1, 2, 3, … - At least one of the optional fields must be provided.
- Existing values will be updated to the input values.
- When editing tags, the existing tags of the application will be removed i.e adding of tags is not cumulative.
- You can remove all the application’s tags by typing
t/without specifying any tags after it.
Examples:
-
edit 1 p/91234567 e/johndoe@example.comEdits the phone number and email address of the 1st application to be91234567andjohndoe@example.comrespectively. -
edit 2 n/Betsy Crower t/Edits the name of the 2nd application to beBetsy Crowerand clears all existing tags.
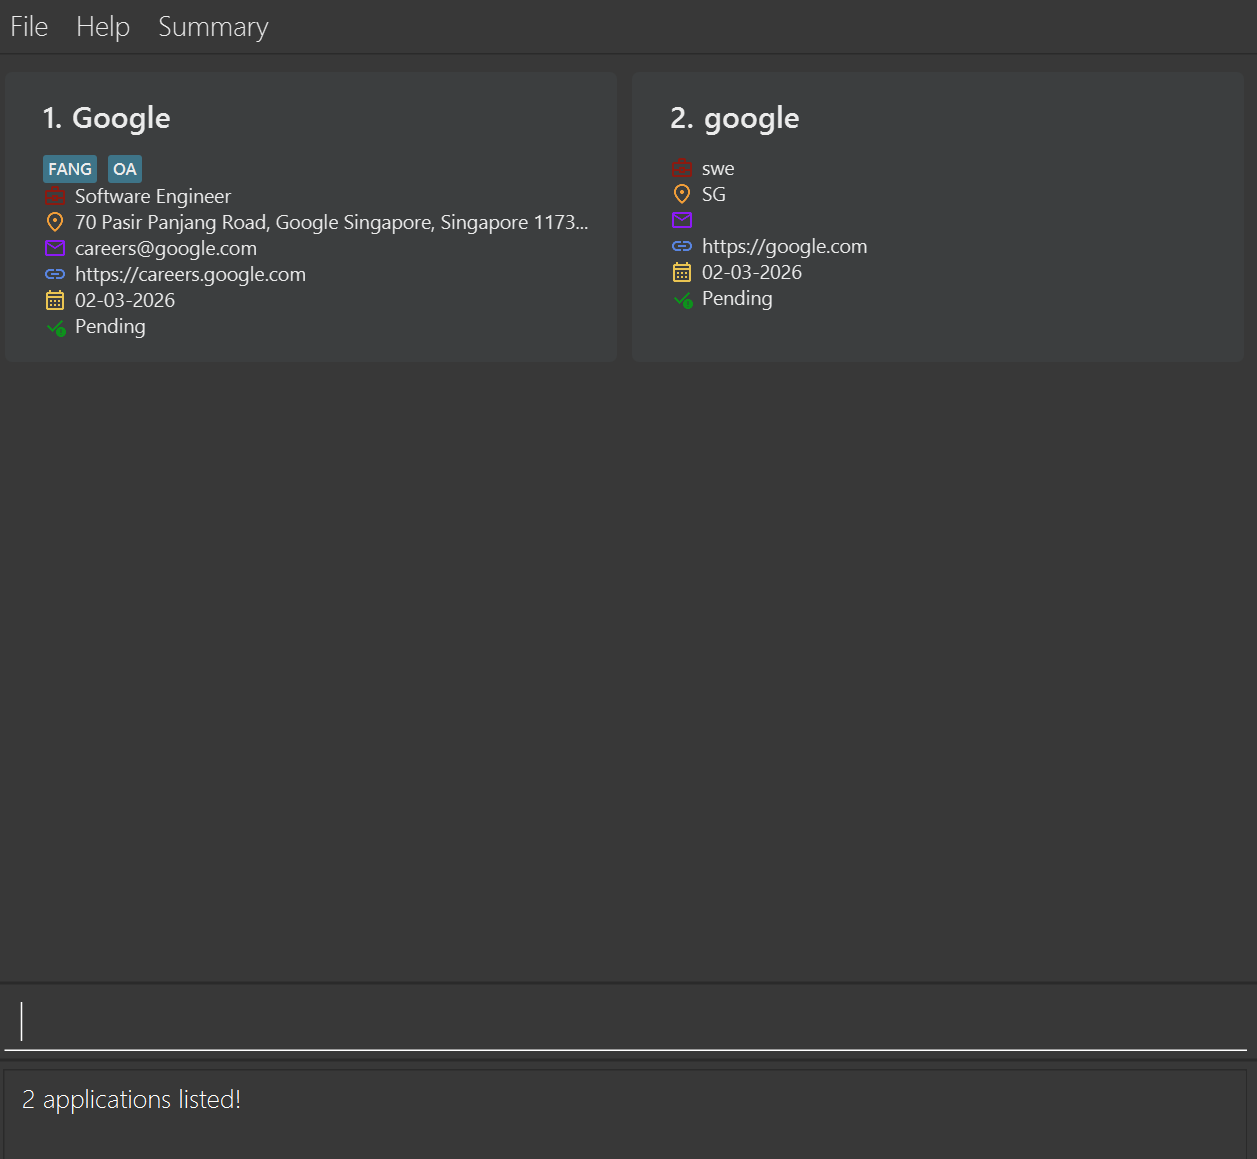
Locating applications: find
Finds applications that match the specified keywords.
Format: find [n/NAME] [r/ROLE] [e/EMAIL] [w/WEBSITE] [a/ADDRESS] [d/DATE] [s/STATUS] [t/TAG]
📖 Terminology
-
Field:
n/NAME,r/ROLE,e/EMAIL,w/WEBSITE,a/ADDRESS,d/DATE,s/STATUSandt/TAGare called fields. -
Prefix:
n/,r/,e/,w/,a/,d/,s/andt/are called prefixes. -
Keyword: the text after the prefix is called keyword.
e.g. in
n/Google,Googleis the keyword.
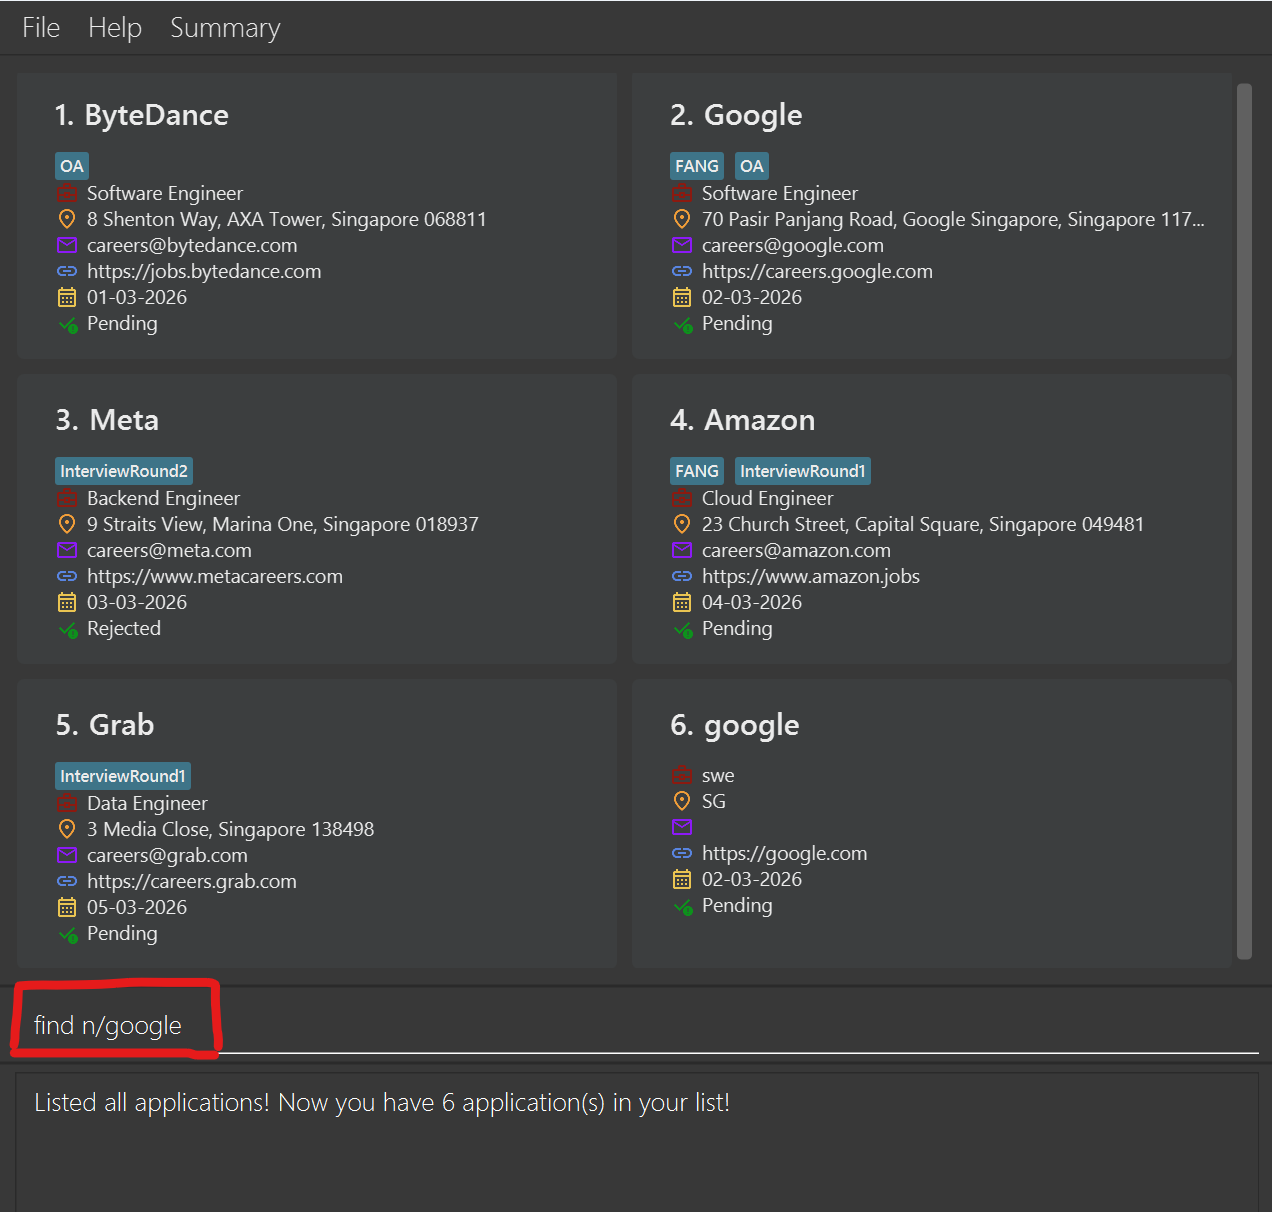
⚠️ General Behaviour
-
All fields (e.g.
n/NAME,r/ROLE) are optional, but at least one field must be provided. -
The search is case-insensitive. e.g
find n/googlematchesGoogle. -
Partial matching is supported for all fields using substring matching (not fuzzy matching).
e.g.find n/GoogmatchesGoogle, butfind n/Goglewill NOT matchGoogle -
Multiple different fields are combined using AND logic. e.g.
find n/Google r/Backend Developerreturns applications that match both name and role. -
For tags, multiple keywords are combined using OR logic. e.g.
find t/backend developer t/frontend developerreturns applications that match either tag. -
For optional fields (
email,website,address): Using an empty prefix (e.g.e/) matches applications with no value for that field. e.g.find e/returns applications that have no email.
⚠️ Important: Prefix-Based Filtering
Filtering is only applied to keywords that are associated with a prefix.
n/, r/, e/, w/, a/, d/, s/, and t/ are valid prefixes for filtering.
Any text without a valid prefix will NOT be used for filtering.
❗ Missing prefix at the start of the command
find Grab s/Pending
-
s/Pending→ used for filtering (status) -
Grab→ ignored (no prefix)
This behaves the same as:
find s/Pending
❗ Missing prefix in the later part of the command
find n/Google Software Engineer
- Everything after
n/is treated as the name keyword
Interpreted as:
n/Google Software Engineer
This searches for a company name containing:
Google Software Engineer
It will NOT treat Software Engineer as a role.
❗ Repeated prefixes
If the same prefix is provided multiple times, only the last occurrence will be used. Finding multiple applications with multiple keywords for the same field at the same time is not supported in this version.
e.g.
find n/google n/meta
This will be interpreted as:
find n/meta
The earlier keyword (google) will be ignored.
Examples:
-
find n/googleReturns applications with company names containing “google” -
find r/intern s/appliedReturns applications with role containing “intern” and status containing “applied” -
find e/gmailReturns applications with email containing “gmail” -
find e/Returns applications that have no email -
find t/oa t/fintechReturns applications tagged with either “oa” or “fintech”
Viewing archived applications
Displays all archived applications.
Format: find t/archived
- Shows all applications that are currently archived.
- You can use the
unarchive INDEXcommand on this list to restore applications.
Example:
find t/archived
Deleting a application : delete
Deletes the specified application from the address book.
Format: delete INDEX
- Deletes the application at the specified
INDEX. - The index refers to the index number shown in the displayed application list.
- The index must be a positive integer 1, 2, 3, …
Examples:
-
listfollowed bydelete 2deletes the 2nd application in the address book. -
find Betsyfollowed bydelete 1deletes the 1st application in the results of thefindcommand.
Archiving an application : archive
Archives the specified application so that it is hidden from the main list but still stored in the system.
Format: archive INDEX
- Archives the application at the specified
INDEX. - The index refers to the index number shown in the currently displayed application list.
- Archived applications will not appear in the normal
listcommand. - Archiving an application does not delete it. The application is tagged as
archivedand hidden from the main list. - You can view archived applications using the
find t/archivedcommand. - The index must be a positive integer 1, 2, 3, …
Examples:
-
archive 2archives the 2nd application in the current list. -
find Googlefollowed byarchive 1archives the 1st application in the search results.
Unarchiving an application : unarchive
Restores an archived application back to the main application list.
Format: unarchive INDEX
- The
INDEXrefers to the index number shown in the archived applications list. - You must first view archived applications (e.g. using
find t/archived) before usingunarchive. - The application will be removed from archived status and will appear in the normal list again.
- The index must be a positive integer 1, 2, 3, …
Examples:
find t/archived-
unarchive 1restores the 1st archived application.
Viewing application summary : Summary
Displays a summary of your job application statistics in a pop-up window.
There are 2 ways to open the Application Summary:
-
Command: Type
summaryin the command box and press Enter. -
Menu bar: Click
Summaryin the top menu bar.
Format: summary
- Shows the total number of active (non-archived) applications.
- Breaks down active applications by status:
Pending,Offered, andRejected. - Calculates your
Success Rate: the percentage of decided applications (Offered + Rejected) that resulted in an offer. Displays0.0if no decisions have been made yet. - Also shows the count of
Archivedapplications separately.
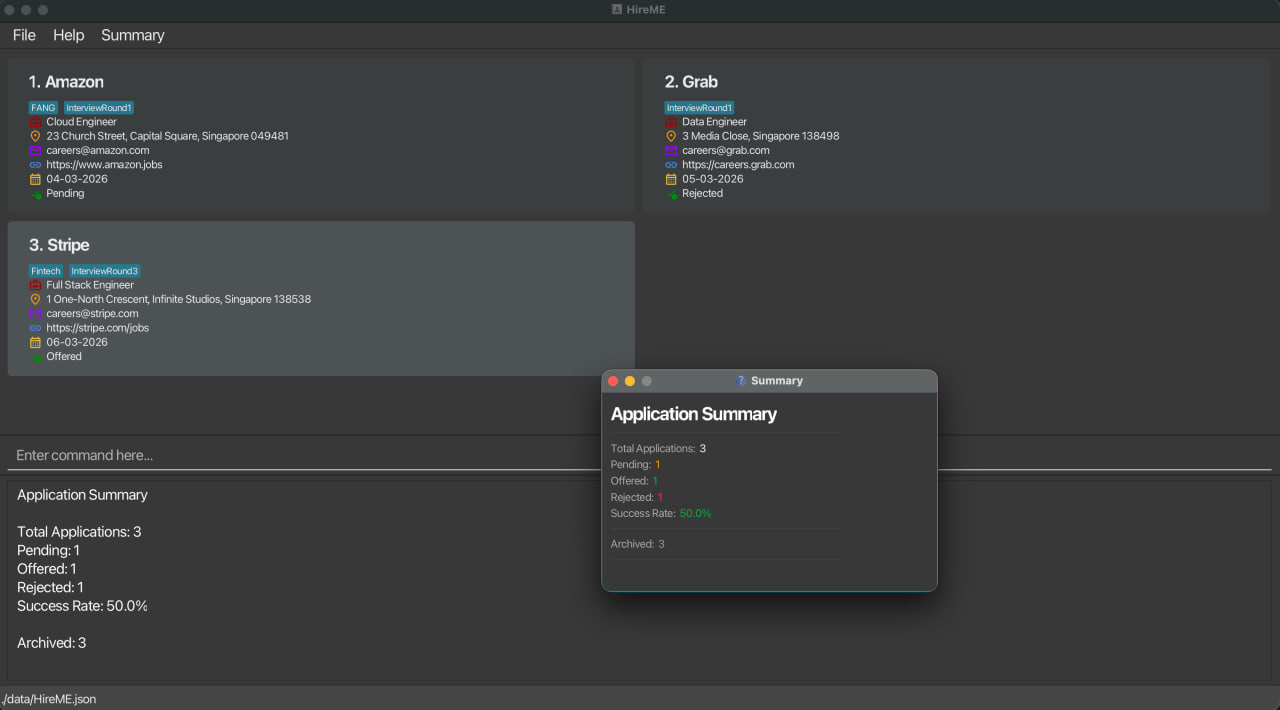
Examples:
-
summaryopens the Summary window showing your application statistics. - Clicking Summary in the menu bar opens the same Summary window.
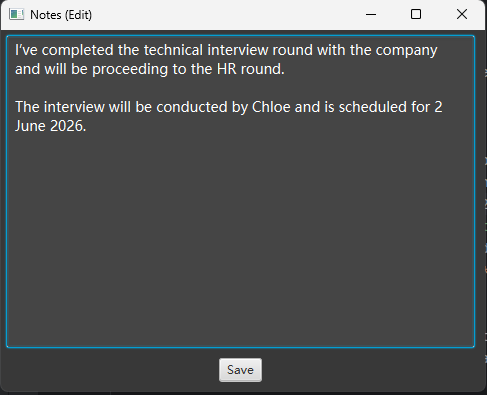
Opening application notes : open
Opens and displays the notes written during the internship application process for the specified application.
Format: open INDEX [m/CHOICE_OF_EDIT]
- Opens the notes for the application at the specified
INDEX. - The index refers to the index number shown in the displayed application list.
- The index must be a positive integer 1, 2, 3, …
-
m/CHOICE_OF_EDITis optional. It must betrueorfalse, and defaults tofalseif omitted. - If
m/falseor omitted, the notes are opened in view-only mode. - If
m/true, the notes are opened in edit mode, allowing you to modify them.
Examples:
-
open 1opens the notes for the 1st application in view-only mode. -
open 2 m/trueopens the notes for the 2nd application in edit mode.
Clearing all entries : clear
Clears all entries from the address book.
Format: clear
Exiting the program : exit
Exits the program.
Format: exit
Saving the data
AddressBook data are saved in the hard disk automatically after any command that changes the data. There is no need to save manually.
Editing the data file
HireME data are saved automatically as a JSON file [JAR file location]/data/HireME.json. Advanced users are welcome to update data directly by editing that data file.
Furthermore, certain edits can cause the AddressBook to behave in unexpected ways (e.g., if a value entered is outside of the acceptable range). Therefore, edit the data file only if you are confident that you can update it correctly.
Archiving data files [coming in v2.0]
Details coming soon …
FAQ
Q: How do I transfer my data to another Computer?
A: Install the app in the other computer and overwrite the empty data file it creates with the file that contains the data of your previous AddressBook home folder.
Known issues
-
When using multiple screens, if you move the application to a secondary screen, and later switch to using only the primary screen, the GUI will open off-screen. The remedy is to delete the
preferences.jsonfile created by the application before running the application again. -
If you minimize the Help Window and then run the
helpcommand (or use theHelpmenu, or the keyboard shortcutF1) again, the original Help Window will remain minimized, and no new Help Window will appear. The remedy is to manually restore the minimized Help Window.
Command summary
| Action | Format, Examples |
|---|---|
| Add |
add n/NAME p/PHONE_NUMBER e/EMAIL a/ADDRESS [t/TAG]… e.g., add n/James Ho p/22224444 e/jamesho@example.com a/123, Clementi Rd, 1234665 t/friend t/colleague
|
| Clear | clear |
| Delete |
delete INDEXe.g., delete 3
|
| Edit |
edit INDEX [n/NAME] [p/PHONE_NUMBER] [e/EMAIL] [a/ADDRESS] [t/TAG]…e.g., edit 2 n/James Lee e/jameslee@example.com
|
| Find |
find prefix/keyword ...e.g., find n/google
|
| Archive |
archive INDEXe.g., archive 2
|
| Unarchive |
unarchive INDEXe.g., unarchive 1
|
| List | list |
| Open |
open INDEX [m/CHOICE_OF_EDIT]e.g., open 1 m/true
|
| Help | help |
| Summary | summary |